 A damper controls the flow of air in your ducts. You can change the flow of air to different levels of your home or different rooms by installing a damper. In this way, you can better control the temperature, especially between summer and winter months. Do be mindful when you add a damper. Your home’s duct system should already have been designed with its individual air flow in mind, specifically in newer homes. It is not to too difficult to install an inline damper. Below are step-by-step instructions for how to install a damper in ductwork.
Step 1 – Understand Terminology
It is a basic principal of science that hot air rises and cold air falls. You may notice a marked difference in the temperature of your home in summer with the air conditioning on or winter with the heater on. If, in the winter, your downstairs is far warmer than your upstairs, and conversely in the summer, a damper installed in your ducts can allow you to change the flow, cutting of the heating to the top levels and letting nature work by letting the heated lower level heat rise. The same holds for your air conditioning, regulating the flow to the downstairs and cooling the upstairs and letting it fall.
There are manual and electric dampers available. On an electric one, you can install a timer so that you can open and close at various times during the day, allowing the air to pass at some times and not to pass at others. This article will address the basic installation. Consult the manufacturer’s instructions when hooking up the electrical style. As always, when working with electricity, turn off the power at the breaker before beginning any work.
Step 2 – Clean Ductwork
Before working on your damper installation, it is not a bad idea to clean your ducts. Your ductwork may be trapping dust, dander, allergens, etc. Not only do you not want to be breathing this, but it can impair optimum air flow.
Step 3 – Determine Location for Installation
Look at your furnace and at the ductwork. If you wish to put the damper on the upstairs line, then you will need to put the damper at the beginning of the duct.
Step 4 – Measure
After you determine where the duct is where you wish to install the damper, measure the diameter of the duct. You will need the same size damper to fit properly.
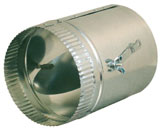
Step 5 – Install Damper
Open up the duct work. Drill 2 holes on opposite ends of the duct. These holes should line up with the predrilled holes on the damper. Remove the fasteners from the damper, connect the damper through these holes into your new holes, and tighten. Seal both sides with duct tape.
If installing a damper which works on electricity, be sure that where you install it is not inline with any water source or spray. At this point you would follow the manufacturer’s instructions. Also, be sure that you have all recommended materials before beginning. You will need the proper electric source in the home (consult manual as well as your home’s wiring for power), additional wire, wire nuts, wire stripper, etc. Be sure that you ground your connections.
Step 6 – Seasonal Adjustment
Now you can adjust your damper, using its manual or electric control depending upon the season, to divert the air to different parts of your home.
Leave A Comment
You must be logged in to post a comment.